FX6 MI Shoe error – Quick field fix

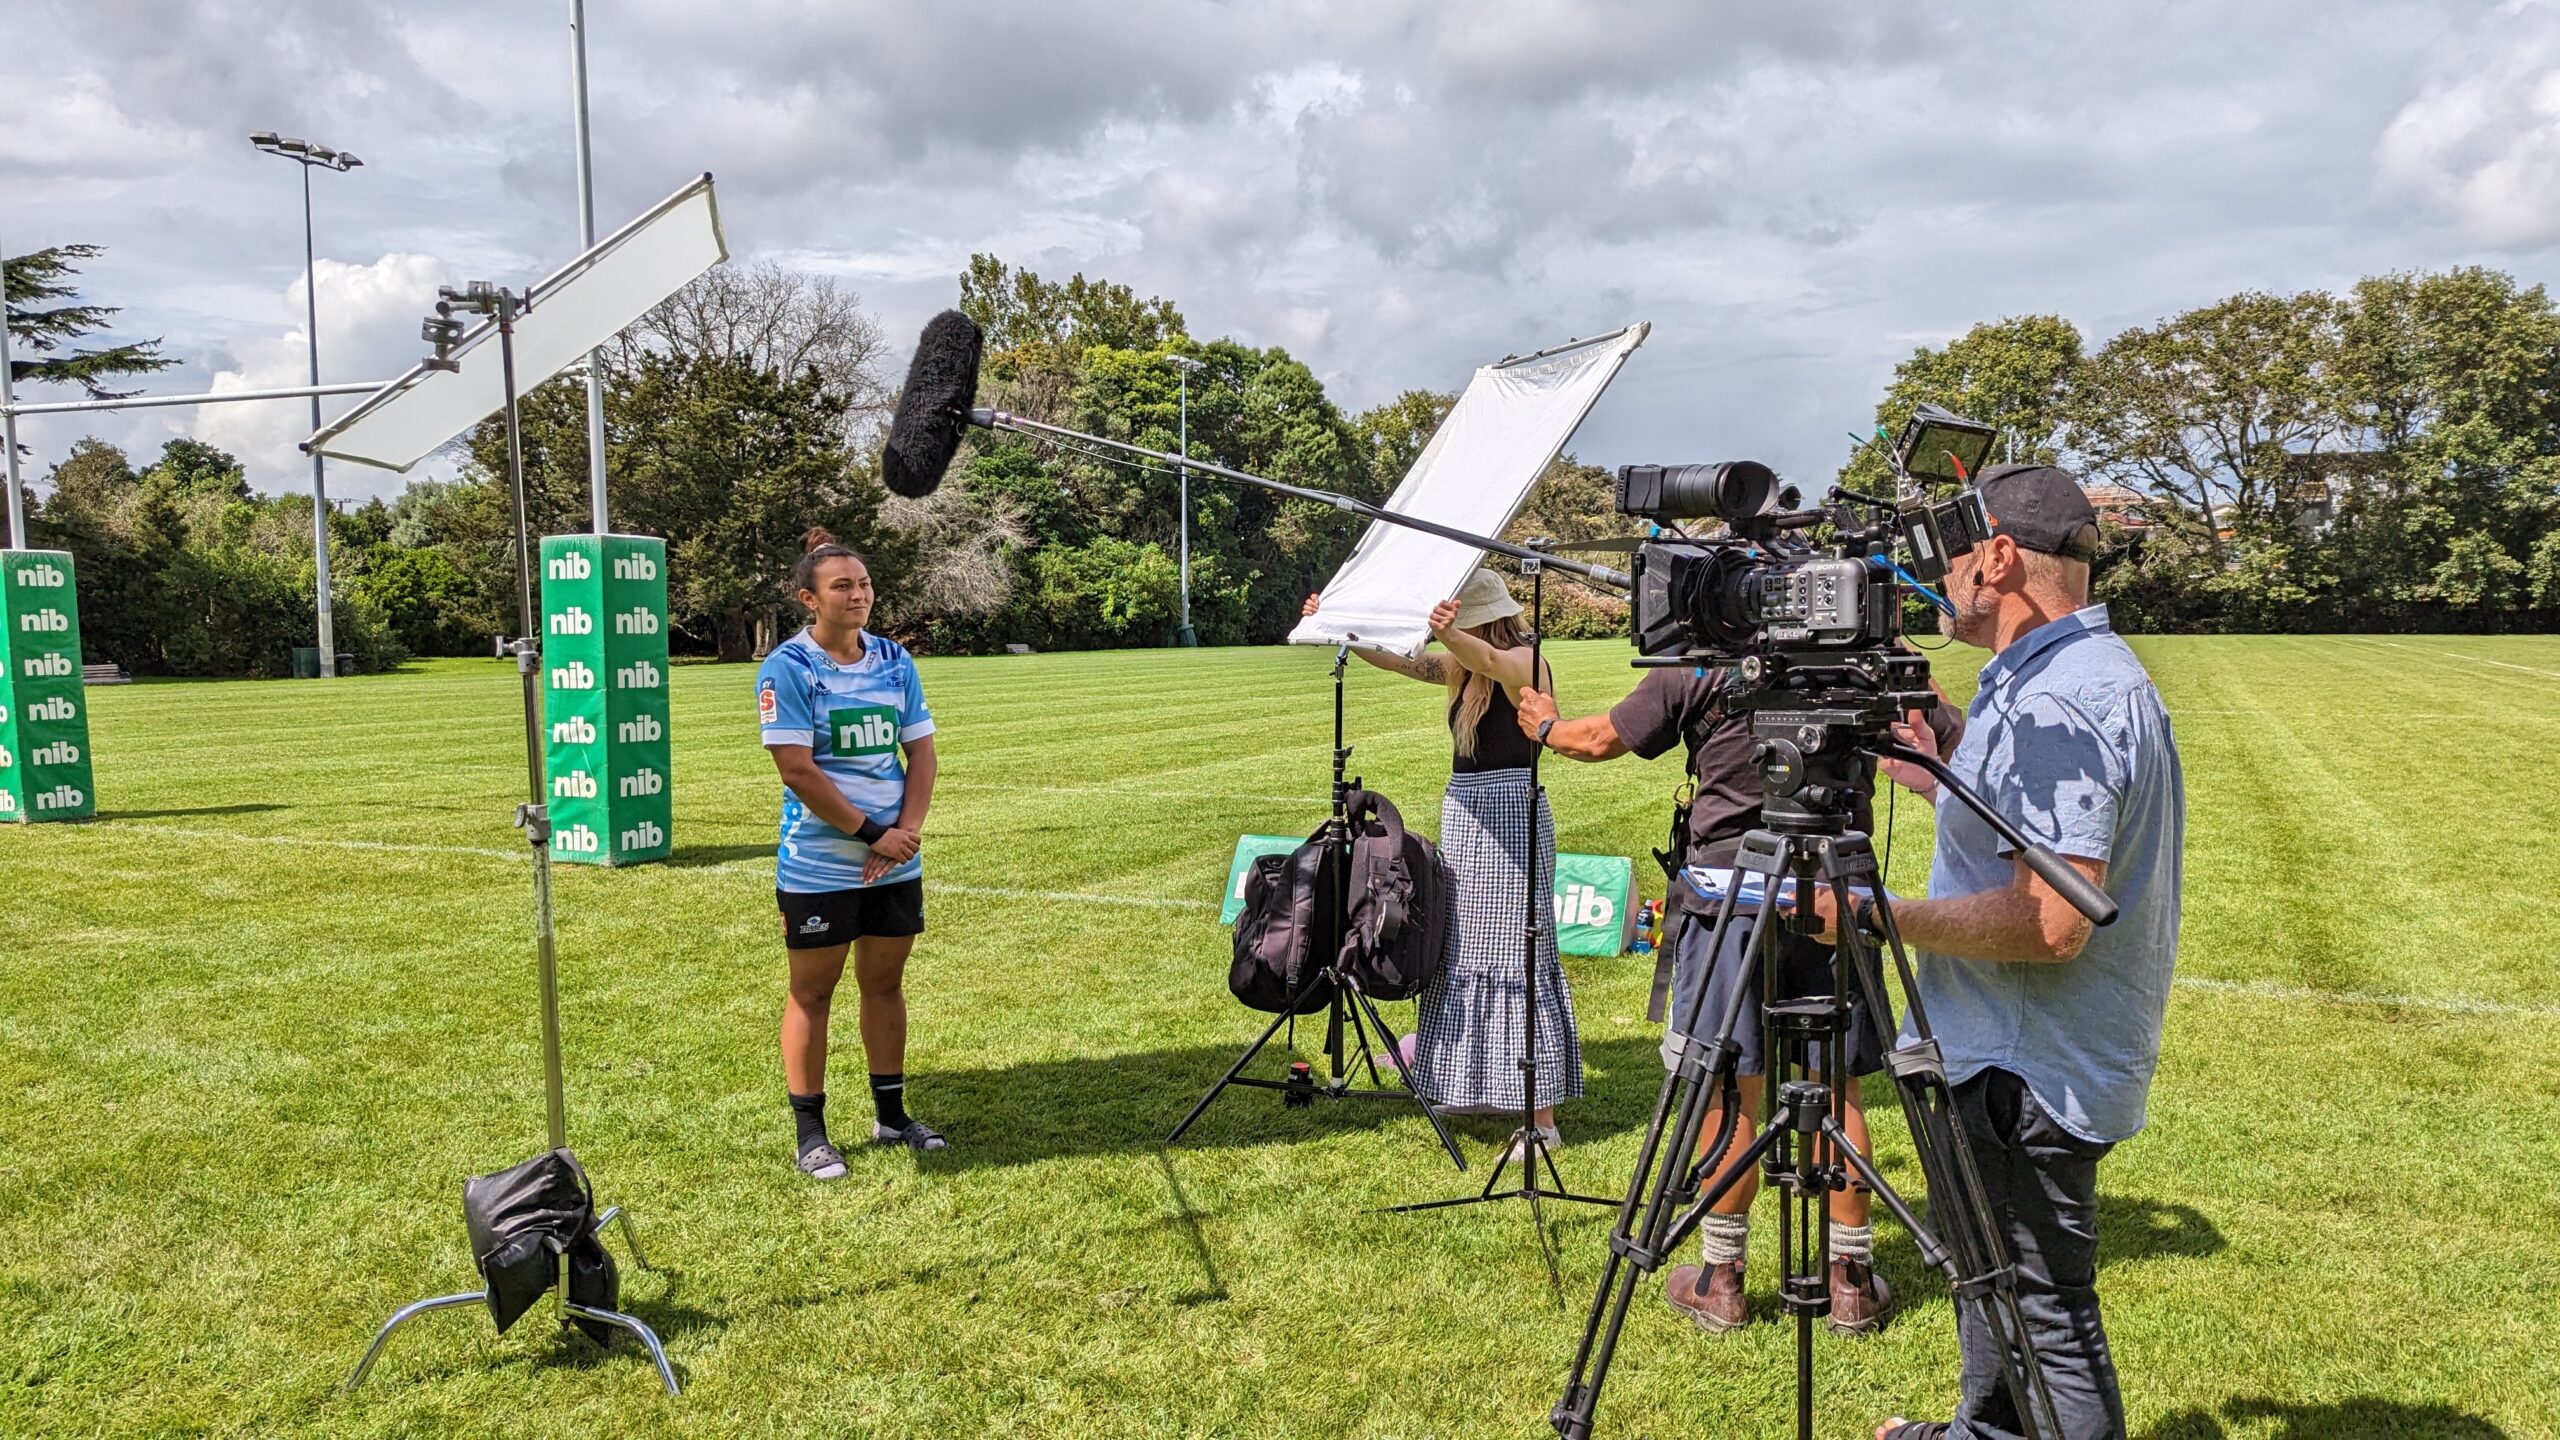
As a freelance cameraman based in Auckland, New Zealand, I frequently operate in unpredictable weather.

I was recently hired to work on a high-profile international golf tournament in Wellington as part of the team tasked with producing social media and extra content to support the main broadcast.

Sony FX6 top handle mic bracket interior showing the screw to expose

However, during practice days and before the actual tournament even started, one of our rented Sony FX6 cameras malfunctioned due to water exposure of the top handle.

The Error and the Missing Cap

The problem was caused by a sudden downpour on the golf course. The crew was caught in the rain mid-course with no cover or rain protection available for their FX6.

The protective plastic cap for the MI shoe was missing—a common occurrence with rental gear and most field-tested cameras nowadays—exposing the contacts to the sudden rain. Water seeped into the shoe, bridging the internal pins and making the camera think there was something connected there, but it couldn’t understand what. 

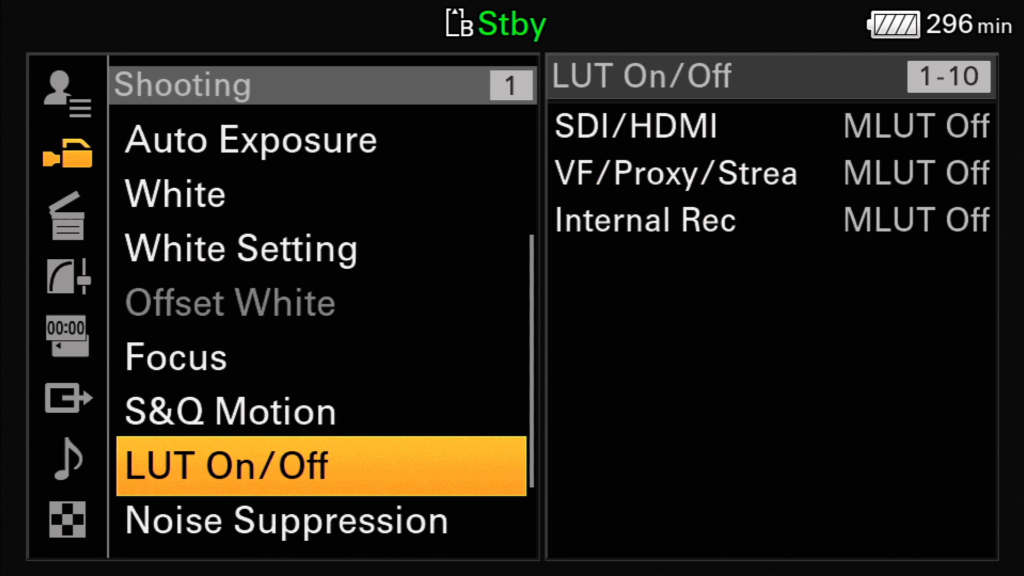
So once they returned to base a few minutes after the downpour, the FX6 displayed a continuous error message on the viewfinder that the: “MI accessory not functioning properly….. etc.” The Multi-Interface (MI) shoe is Sony’s proprietary hot shoe and at the time of the error, it was completely empty. However, the message continuously interrupted the operator’s view and rendered the camera inoperable.

The Field Repair

With no immediate backup camera available on the course, I offered to fix the malfunctioning handle in order to keep the production moving. Being familiar with the internals of the handle after my own FX6 handle disaster, I knew the MI shoe connects to the handle’s main circuit board via a  ribbon cable. By physically disconnecting this, I was pretty sure that you can isolate the MI shoe and clear the error.

The Result

Powering the camera back on confirmed the error was cleared.

Disconnecting this specific ribbon cable disables the MI shoe but does not affect the standard XLR audio inputs. So our crew was able to plug the shotgun microphone back in and keep working as if nothing happened and the FX6 was successfully utilized for the remainder of the tournament. However, we knew that the MI shoe was not functioning and the camera would need to go in for a repair after this job, something we informed the rental house about.

The main takeaway from this situation is that if you are in an environment that will potentially expose your camera to water, you need to ensure that your MI shoe cap is always firmly installed when not actively running a top-mounted accessory, and always carry basic rain protection. Understanding the hardware architecture of your equipment might provide critical options in emergency situations, but it is always better to prepare than to repair.


The Repair Process


⚠️ DISCLAIMER & WARNING ⚠️

Please read before proceeding. Opening camera equipment voids warranties and risks permanent damage to delicate internal components. This procedure is a last resort for emergency situations when no backup camera is available. It should only be attempted by individuals who are highly confident working with small electronics and ribbon cables.

I take absolutely no responsibility for any damage, malfunction, or voided warranties that may occur to your equipment by following these steps. Proceed entirely at your own risk.


If you are out of options and need to bypass the MI shoe short circuit, here is the mechanical process to isolate the error.

Tools Required:

Tools required
  • A small Phillips-head screwdriver
  • A pair of tweezers
 

Step 1: Remove the handle from the camera and remove all accessories from the handle.

You need to take off any monitors, cables, or anything else that is screwed on the handle and have it bare as above.


Step 2: Remove the Mic Bracket

Before opening the main handle casing, the microphone holder must be detached to expose one of the handle screws.

  1. Look inside the mic bracket on both sides of the metal bracket holding the assembly in place.
  2. Locate and unscrew the 2 screws securing it to the handle. Set the bracket and screws aside securely.
Sony FX6 top handle mic bracket interior showing the 2 screws
Location of the 2 screws inside the mic bracket.
Sony FX6 top handle mic bracket interior showing the screw to expose
This is the screw we need to expose.

Step 2: Open the Top Handle

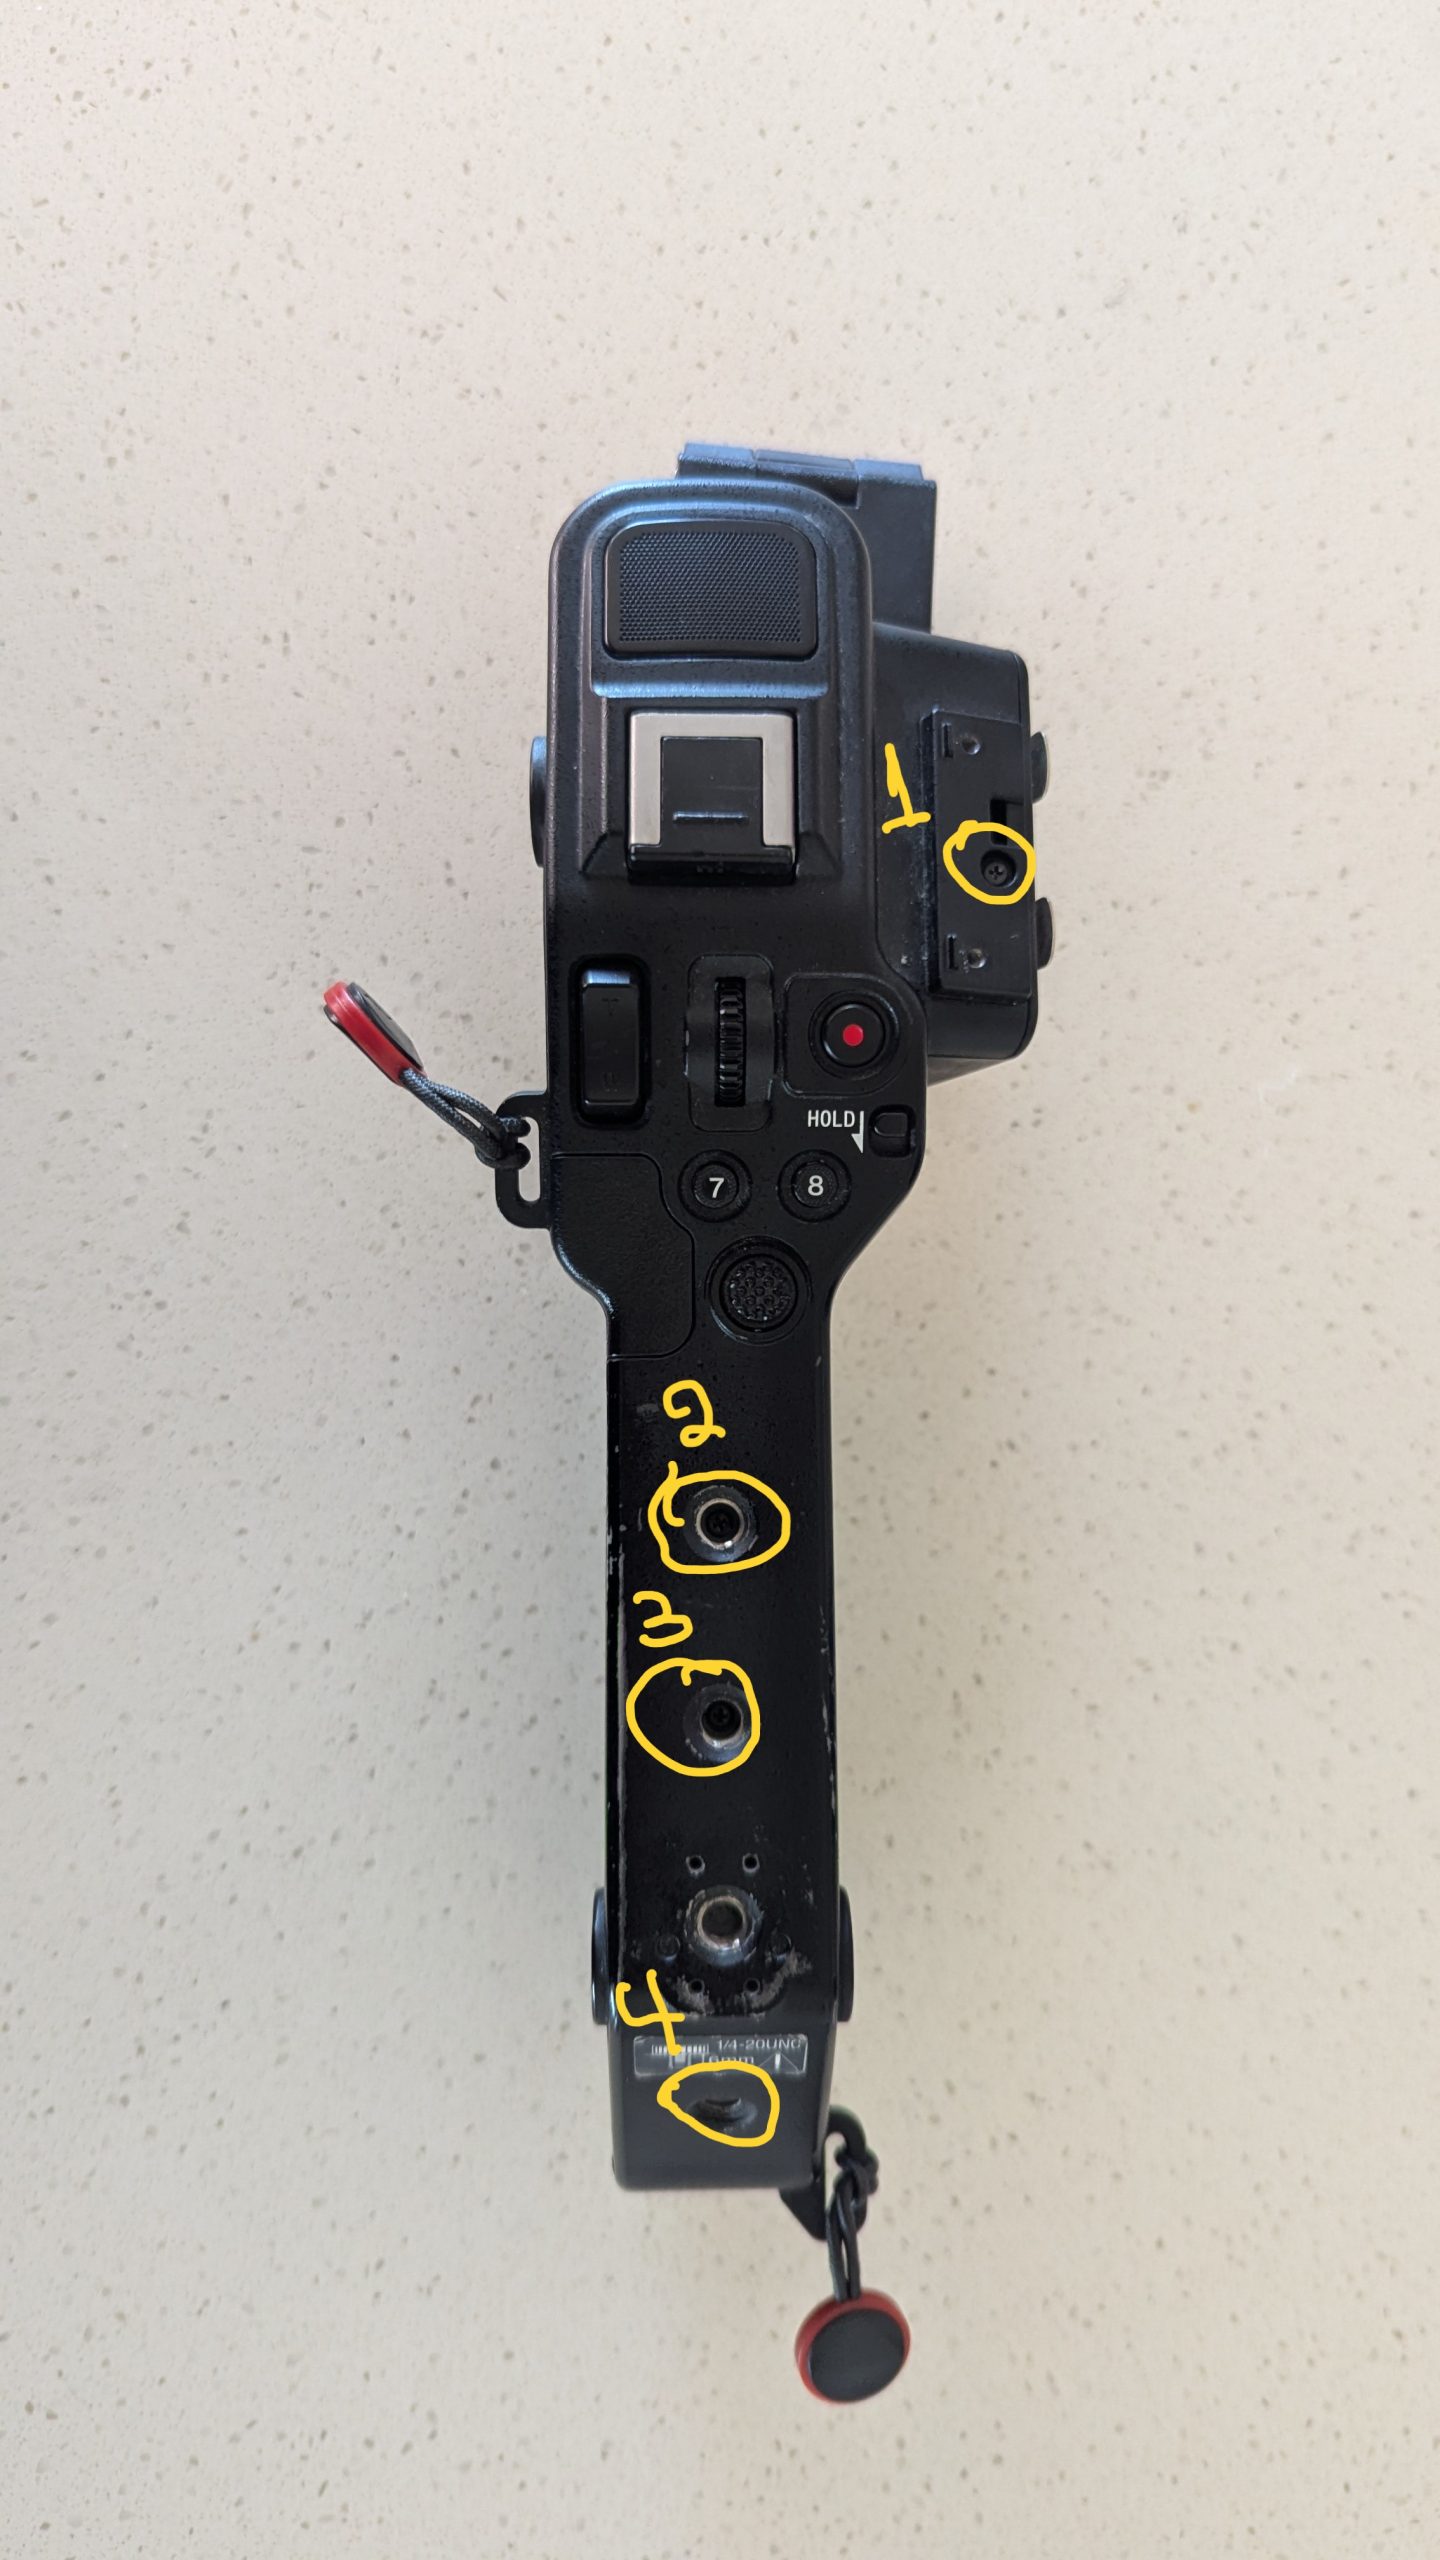
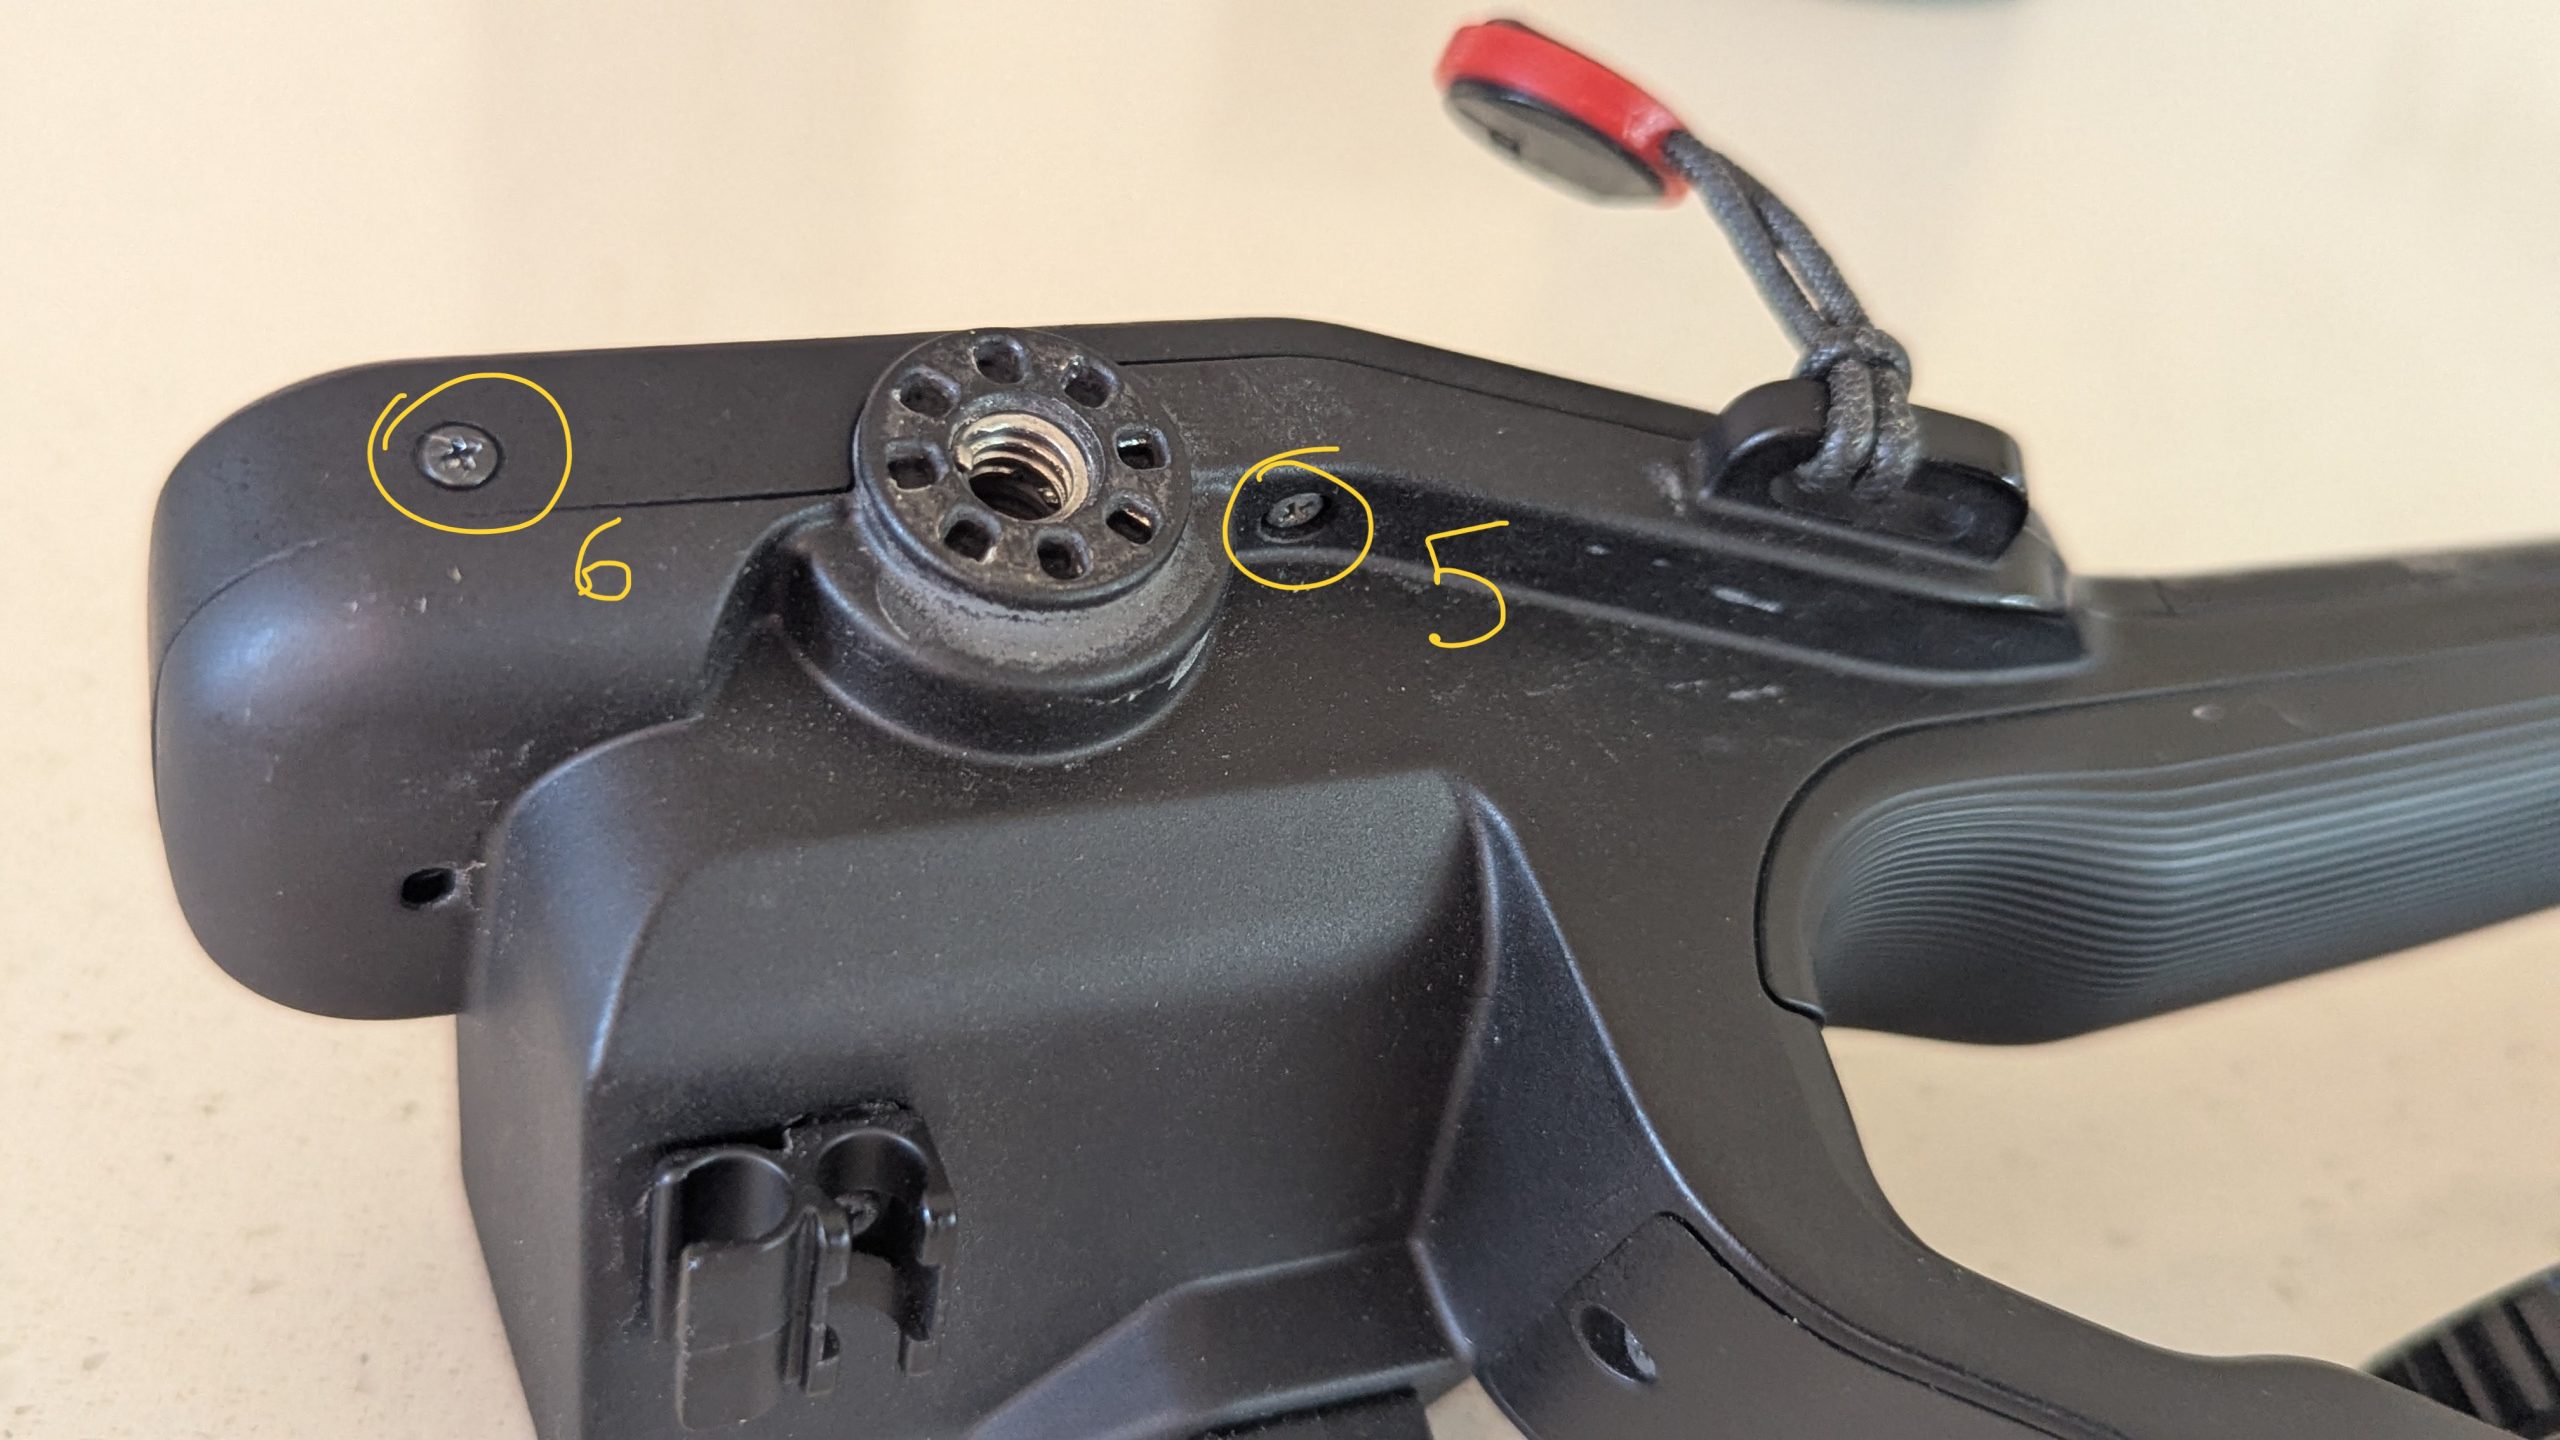
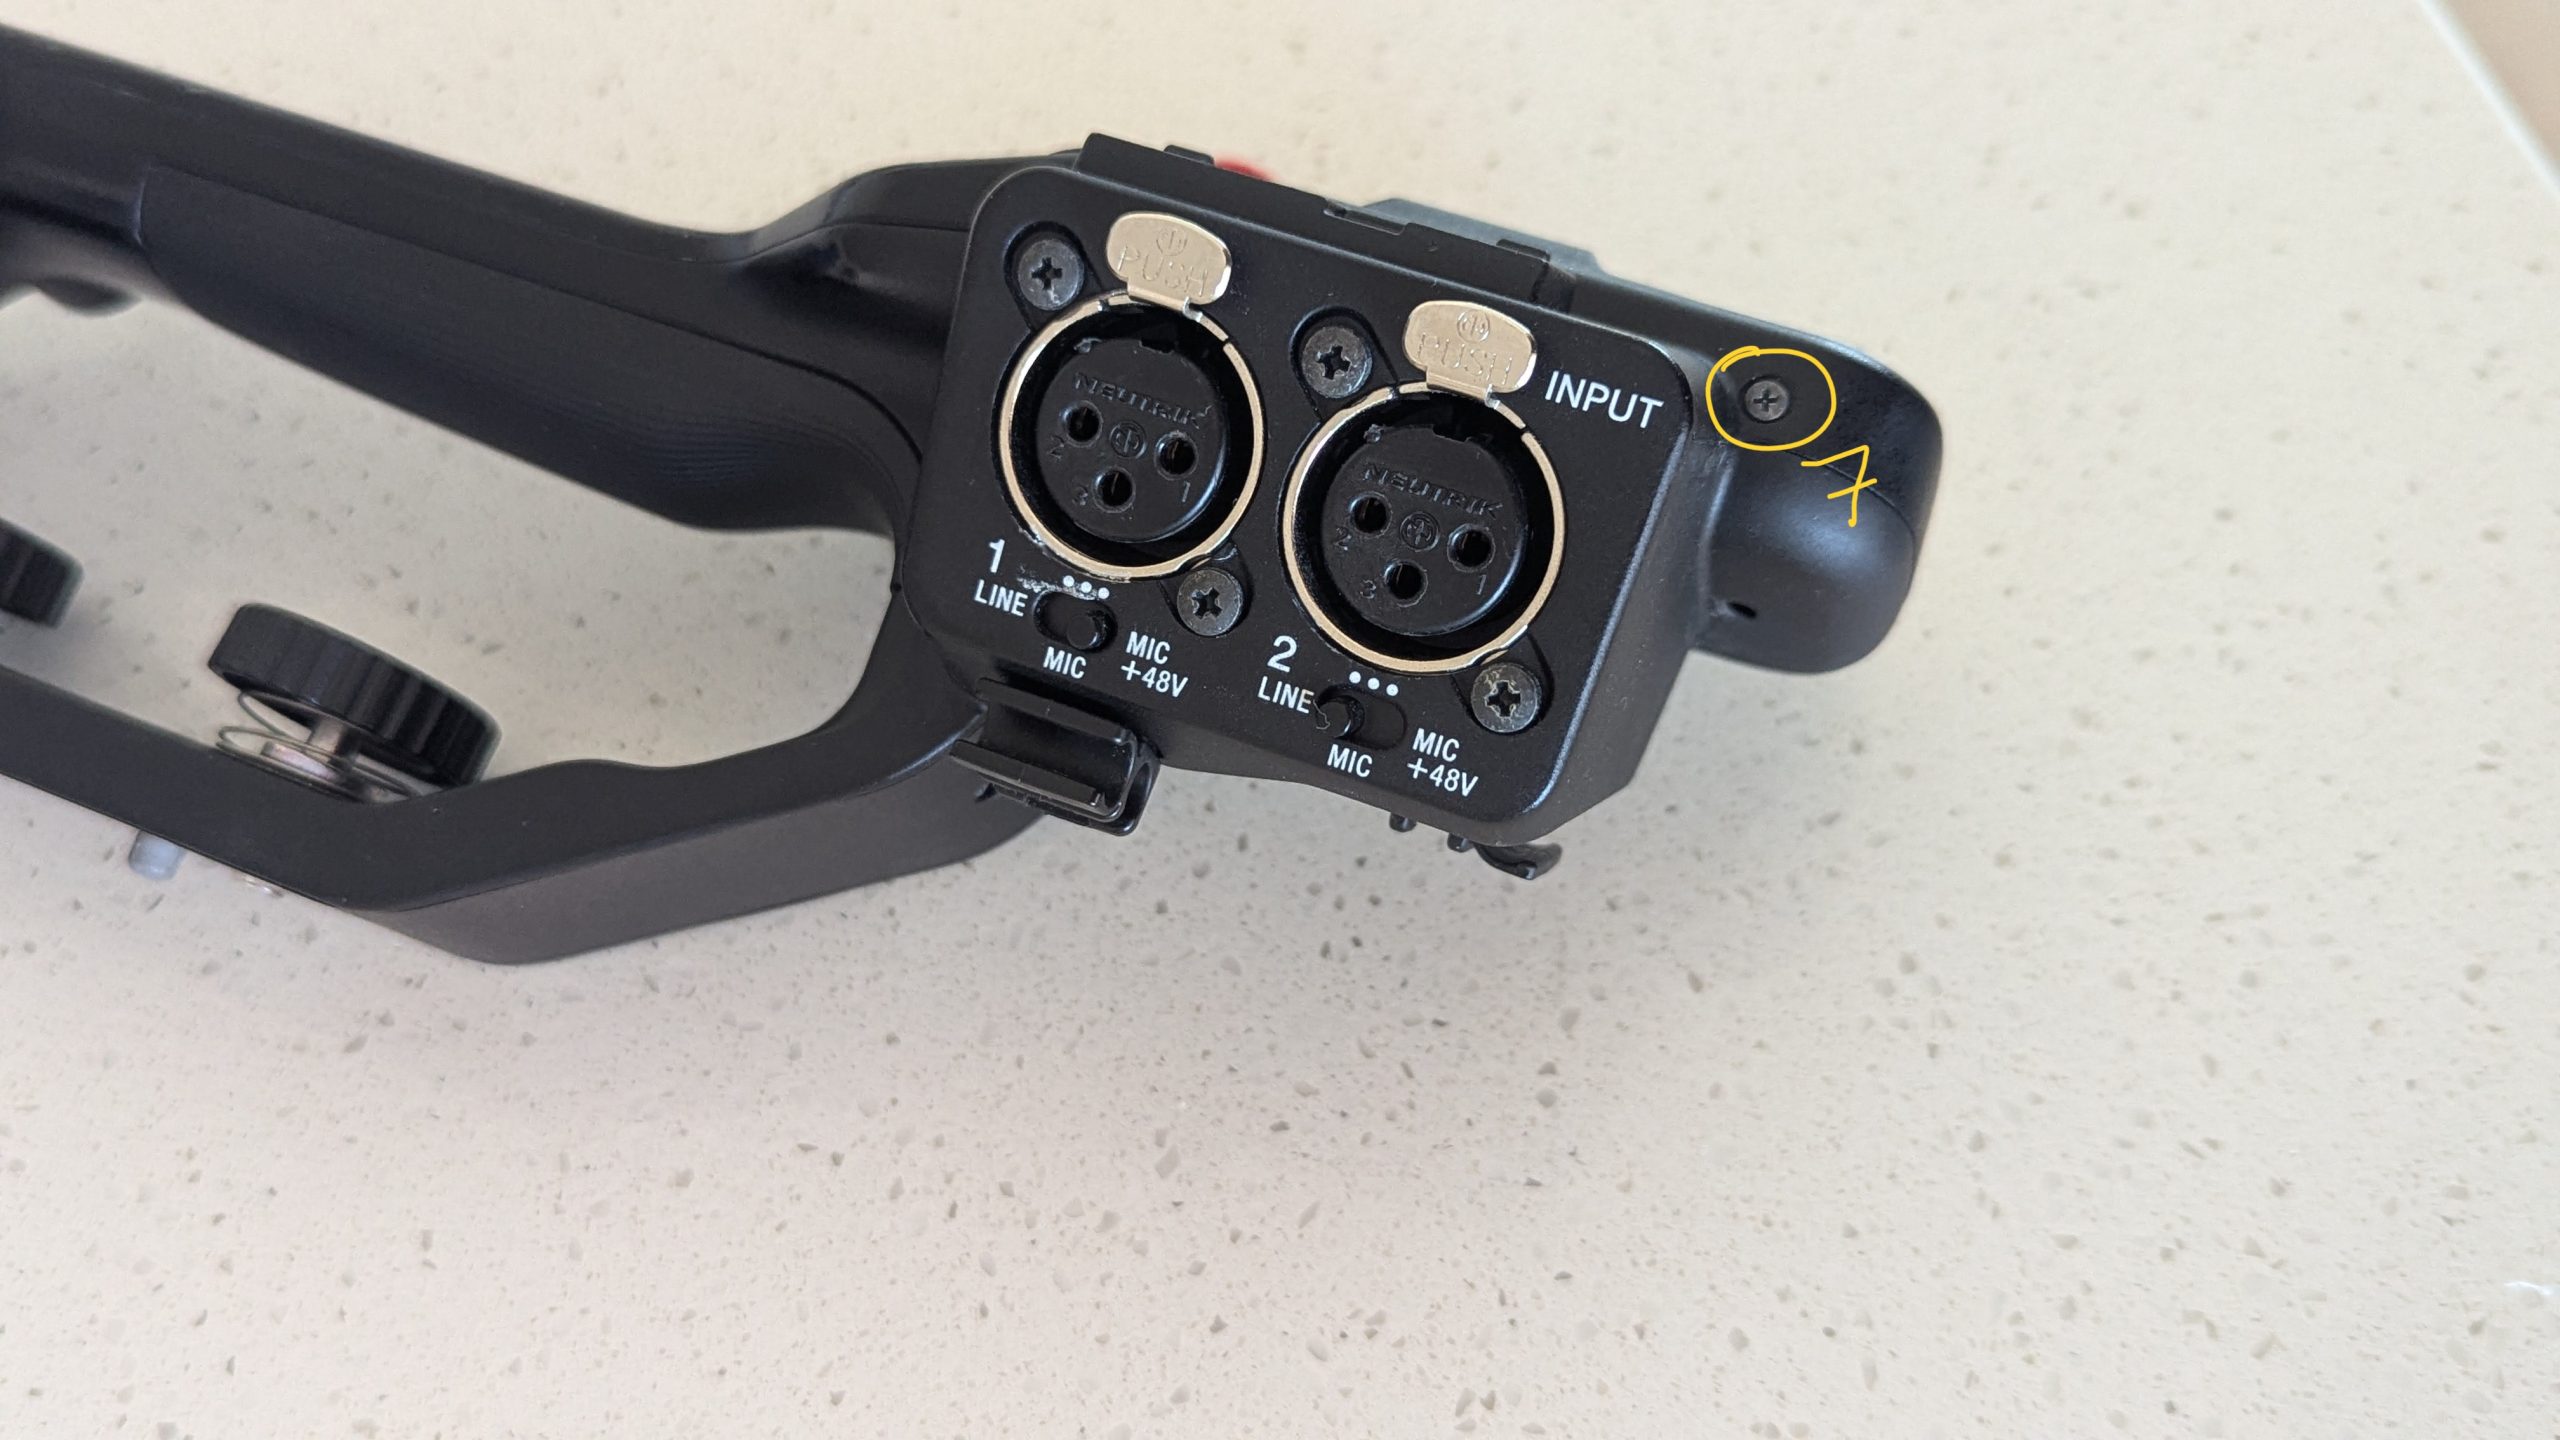
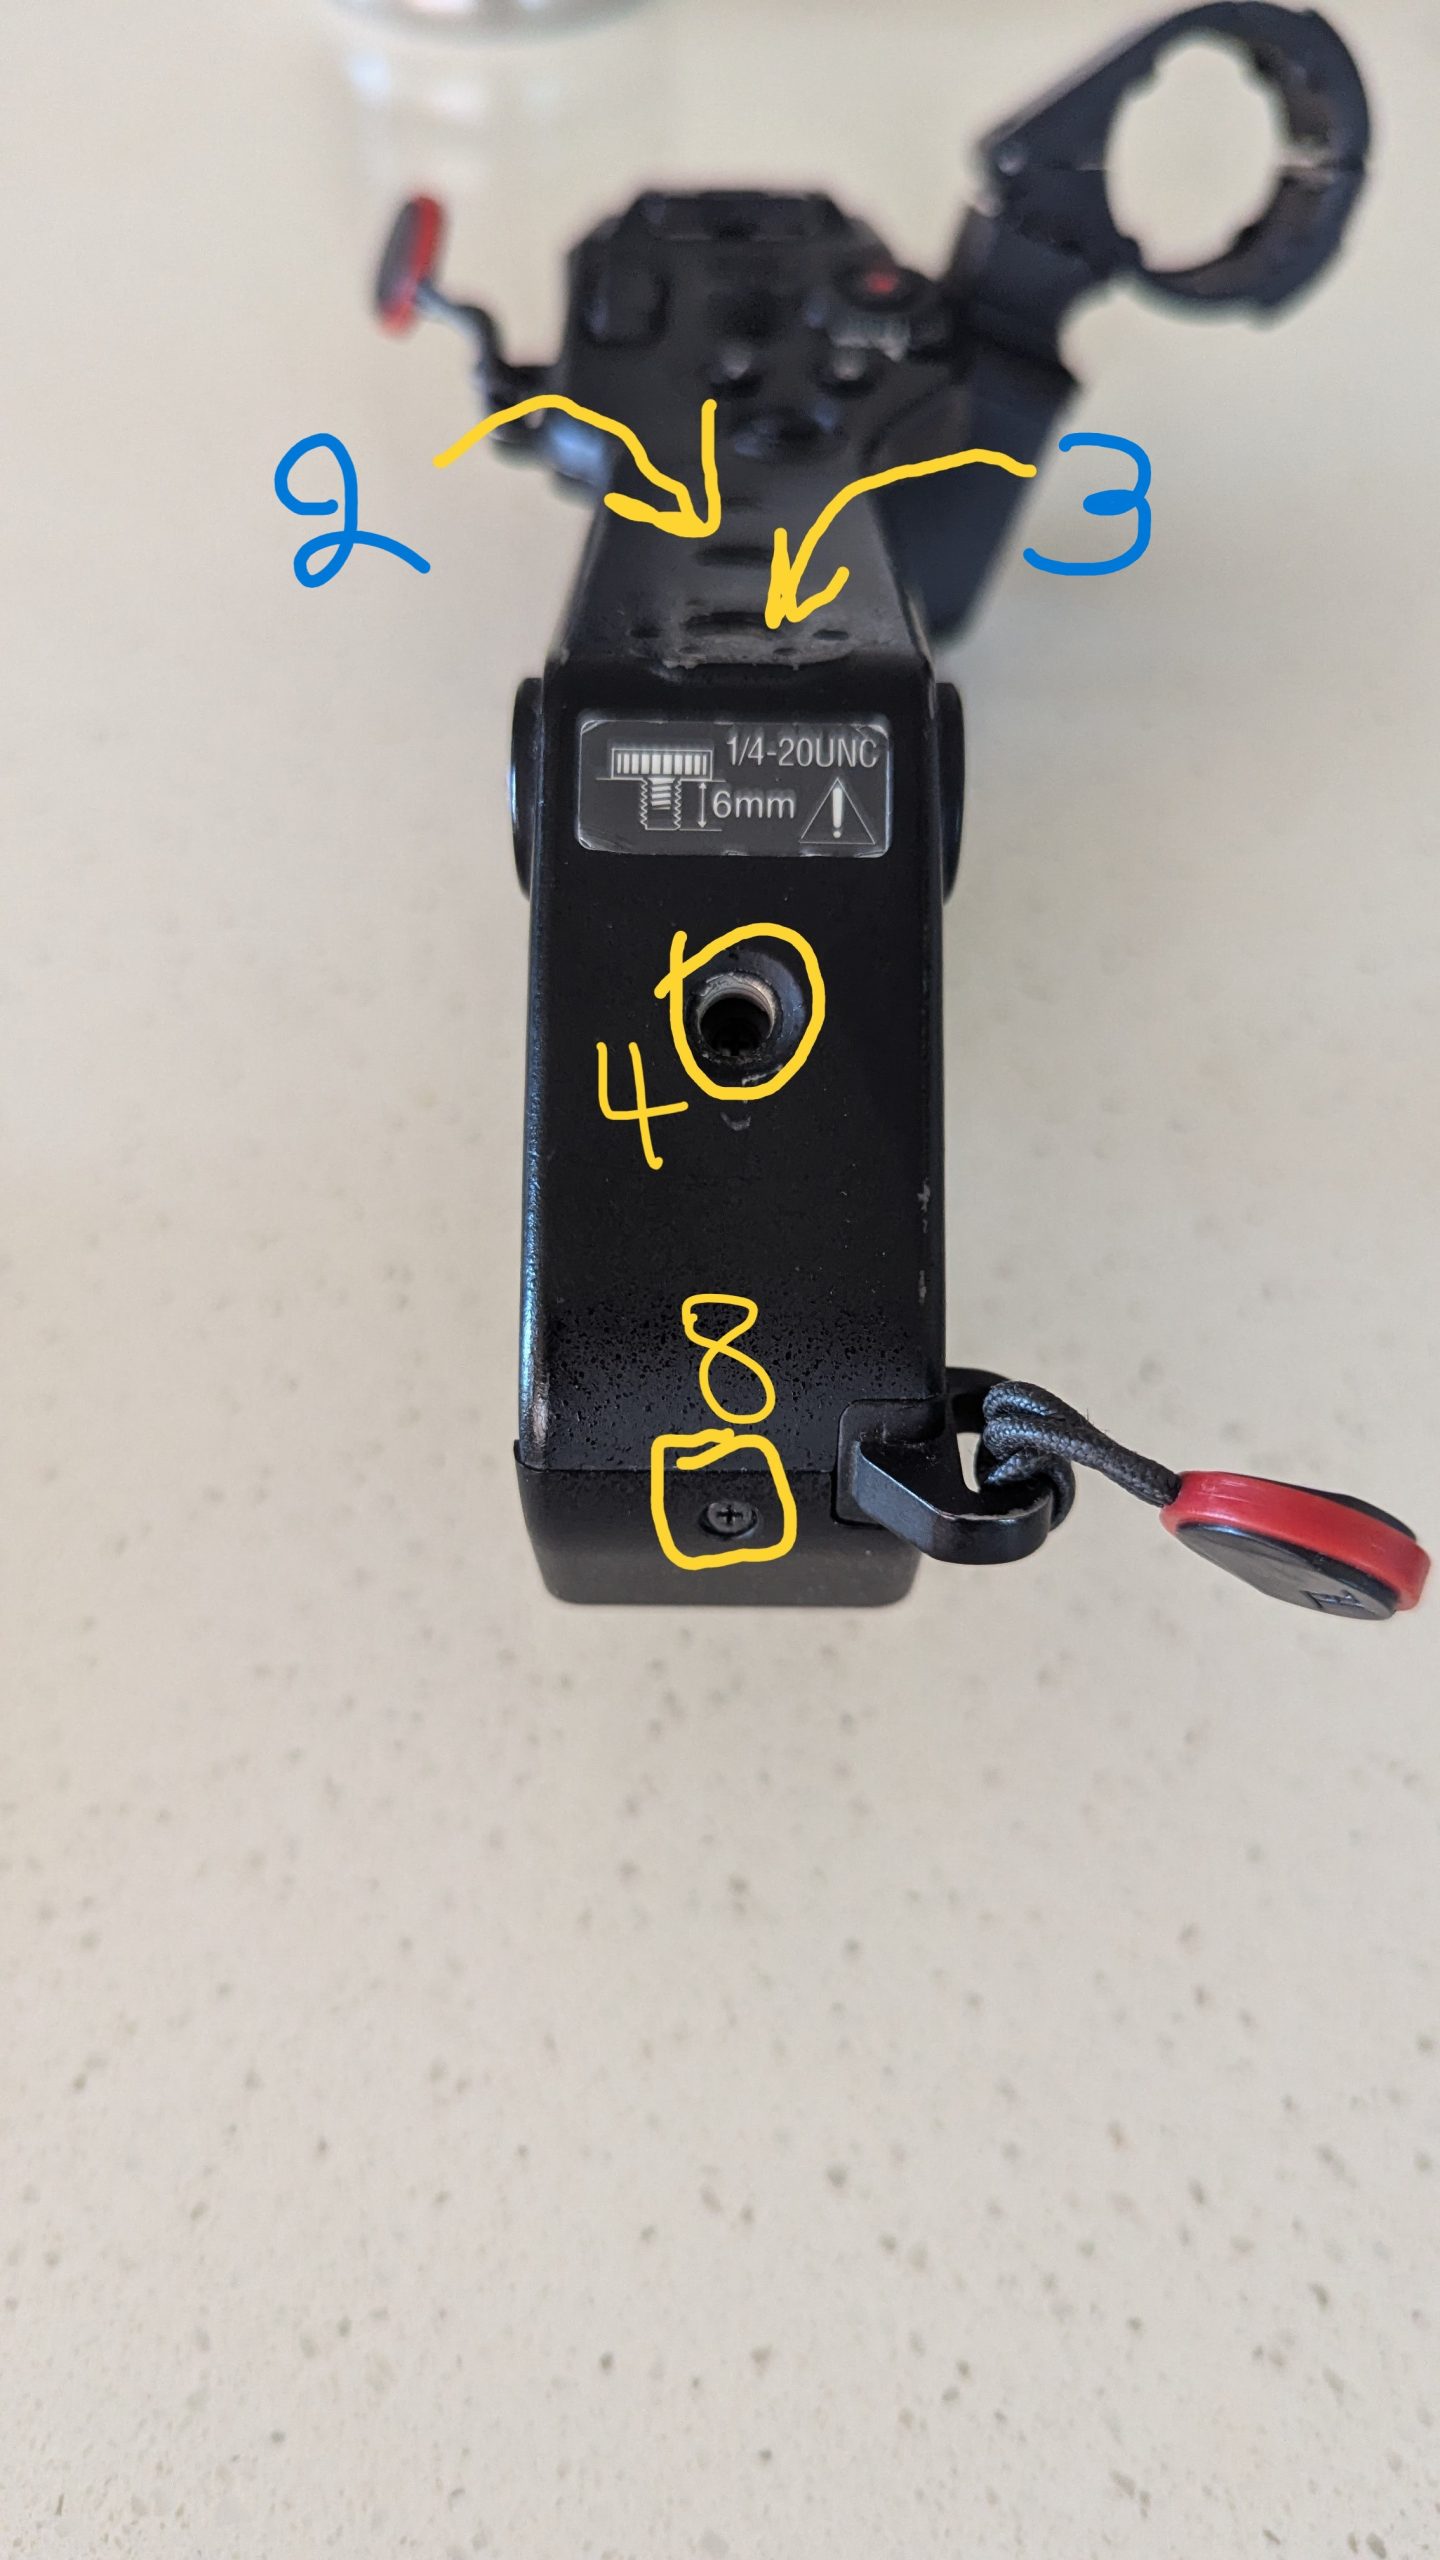
  1. Locate the screws along the top, the back, and the front of the handle as per the following photos. There are 8 screws that need removing. Keep them somewhere safe, as they are easily lost in a field environment. They are all the same size, so you don’t need to remember which one goes where
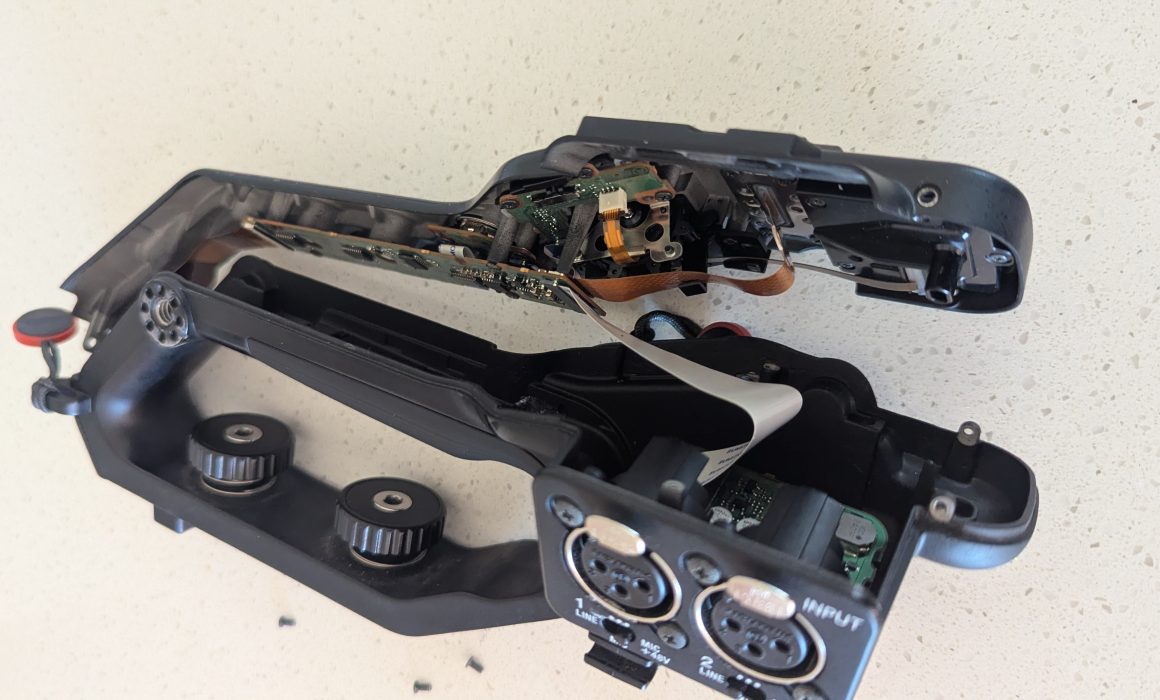
  2. Carefully lift the top casing off the handle to expose the main board. Be careful as the handle is not able to open fully due to the attached audio ribbon cable. If you unplug or damage the white ribbon cable, your camera will no longer have audio.


Screws that need removal

The handle opened up

Step 3: Disconnect the MI Shoe Cable and Reassemble

Sony FX6 MI shoe ribbon cable being disconnected

  1. Locate the MI shoe ribbon cable. It is the thin brown ribbon cable under the white one.
  2. Using tweezers (or your fingers if they are thin enough), gently grip the ribbon cable and pull it straight out of its connector on the board. Note: It is held in place entirely by friction. A steady pull is sufficient; there are no mechanical latches to flip.
  3. Secure the loose cable inside the housing so it does not short against other components.
  4. Carefully place the top casing back onto the handle. Ensure all internal cables are seated correctly and are not being pinched by the casing.
  5. Reinsert and tighten the 8 handle screws, then reattach the mic bracket.
 

GOOD LUCK!

About the Author

Christo Montes is a professional Auckland Cameraman with extensive experience shooting corporate, documentary, and broadcast content across New Zealand and internationally. He specializes in delivering high-end visuals and reliable, stress-free production services.


Saving Christmas: Technical Cinematography for TVNZ

Working as a freelance cinematographer in New Zealand, I’ve shot everything from high-end corporate interviews to run-and-gun documentaries. But every now and then, a script lands in my inbox that requires a distinct blend of creative lighting and rigorous technical discipline.

I recently teamed up with TVNZ to shoot a Christmas TVC for Woolworths. The premise was high-stakes holiday drama: Santa’s reindeer were out of carrots, and alarms were blazing in the “Santa Control Center.”

The Challenge: A Fixed World

To transport our talent into the high-tech digital world of the Control Center, we utilized a 12x12ft blue screen frame.

Why blue instead of the industry-standard green? Simple physics: our Elf was wearing a bright green costume. If we had used a green screen, he would have become invisible, blending right into the background. So, blue it was.

While this solved the wardrobe issue, working within the confines of a fixed 12x12ft frame introduced a significant geometric challenge. We needed to capture the frantic interaction between Santa and the Elf from multiple angles, but the relationship between the camera and the blue background had to remain fixed to ensure coverage. If I moved the camera too far to get a side angle, I would shoot off the edge of the blue screen.

Moving the Set, Not the Camera

To solve this, we couldn’t simply move the camera around the actors. Instead, we had to rotate the entire set around the camera.

This required meticulous lighting prep. Before we rolled, I sketched out the lighting plan for the “real world” of the Control Center, determining exactly where the alarm lights and console glows would originate in the virtual space.

For every setup change, we physically rotated the actors and props relative to the blue screen. I then had to re-rig the floor lighting for every single angle. The goal was to ensure that even though the physical set had moved, the light hitting the actors’ faces maintained the continuity of the virtual background.

The “Cleanest Key”

Having extensive experience with visual effects (VFX) and chroma keying, I know that a composite is won or lost in the camera. It’s not just about lighting the talent; it’s about achieving perfect separation and even exposure on the screen itself to ensure the digital background doesn’t stick out as a sore thumb.

I applied strict technical standards to the lighting ratios to make life easy for the editors. It was incredibly validating to hear back from the post-production team that this was the cleanest blue screen key they had ever received.

They were thrilled with how effortlessly the footage keyed out, which meant they could spend less time fixing technical issues and more time polishing the final creative look.

Mission Accomplished

It was a technically demanding shoot, but delivering high-quality rushes that make the post-production workflow smooth is one of the most satisfying parts of the job.

Plus, I’m happy to report that the mission was a success. The carrots were restocked, the alarms were silenced, and the reindeer were fully fueled for the big night. Just another day at the office helping to save Christmas!

Here is the finished 30sec TVC

  • Production – TVNZ Blacksand
  • Creative Director – Shannon Addison
  • Creative Producer – Will Munro
  • Head of Production – Varsha Singh
  • Commercial Producer – Xanthe Price
  • DOP – Christo Montes
  • Gaffer – Paul Eversden
  • Technical Manager – Ryan Everitt
  • Sound Operator – Eugene Arts
  • Offline Editor – Will Munro
  • Online Editor – Nick Henderson
  • Grade – Gareth Pearce
  • Sound Mix – Roger Green


Sony FX6 handle – Electronics and sound input

Disaster… Or opportunity?

A few weeks ago I was on a shoot out of Auckland. I was commissioned as a cameraman on a documentary that required some b roll and then a studio setup for some interviews on a black background.

While I was setting up for the studio part of the day, for the first time after many years, I was careless and allowed for a pretty serious accident to happen. I didn’t realize that I had not fully opened the legs of my 100mm Flowtech that held my Sony FX6 on it, resulting in the whole rig tipping over and landing on the ground face first. No time to catch it, just a frozen look on the ground at the various pieces the camera was now in… Potential disaster since we had not yet started our studio interviews.

A quick assessment with the camera still off, showed that the viewfinder mount rod took the brunt of the fall, snapping the FX6 handle in 3 pieces. After powering up the camera, it did function, but seemed to freeze. Knowing that the FX6 has a data connection to the handle, I thought the freeze could be from the damaged handle, so I took it off. And once that was off, the camera powered up fine and was ready to rock n roll… But without sound, as the sound connectors of the FX6 are on the handle.

Fortunately I have recently purchased the Deity Theos wireless mic system that has 32bit internal recording on the transmitter. So with a timecode sync between FX6 and transmitter and a backup wireless feed going to the B cam (Sony A7IV) I managed to get the job done without a hitch, despite the disaster. And this is when I realized that deep technical knowledge is very useful in this job, especially in situations like this.

After the job was done, I of course ordered a new handle which was covered by my insurance. When you make a claim the broken part is then property of the insurance company, so I had to return it to the service centre. However after asking the insurer, they were nice enough to allow me to have the broken handle back as I wanted to run some experiments on it.

The much discussed FX6 sound circuitry

Since the Sony FX6 was introduced, a big complaint from users has been the inability to input sound in the camera without having the handle on. And this is what I wanted to explore… Does the sound circuitry work without all the other electronics of the handle connected? (Handle custom buttons and controls). If yes, can someone just make a custom box with these parts and utilize the sound ports without the handle?

It seemed that all the boards in the handle were still intact after the fall, so I removed them from the broken part and after taking a couple of deep breaths, I connected them to the camera and powered it up.

The camera not only didn’t boot up, but also required me to remove the battery in order for it to resume normal operation. Initially I thought that this is because of the lack of the rest of the electronics and abandoned the idea.

However, I then realized that I had not made sure I connected the ribbon cables correctly (picture above). Going back and tracing how the cables were sitting in the handle I found the correct way of connecting them and gave it another go. And this time it was successful, the camera booted up and also accepted sound from the XLR inputs!

Which means that the camera actually protected itself from damage when it sensed the incorrect ribbon placement, a safety feature that probably saved me from a fried camera mainboard. Phew!

The parts

DISCLAIMER

By using the information provided below, you acknowledge and agree that any actions you take based on this information are at your own risk. I am not responsible for any outcomes related to the use of this information, including but not limited to, any damage to your camera or other equipment.

This is what most people will be here for. Since the interest in creating a sound input to the FX6 without the handle is large, here are my findings with full details and part numbers.

In order for the camera to accept sound it needs 2 boards, 2 ribbon cables and one connector. A total of 5 parts.


The parts required for sound import into the Sony FX6 are the following:

1. The connector

This is the part that connects to the camera body. It is a proprietary Sony connector with the code number HC1002 Board Connector In Handle. A quick Google search currently shows that part available both on eBay and AliExpress at a cost of $54US.


2. The data cable

This is another proprietary Sony part with the model name FP-2470 Flex Cable. It connects the HC1002 Board connector on one side and the HN-1054 driver board on the other. It is available on eBay at a cost of $37US.


3. Top handle PCB

This is the main board where all the data gets encoded and passed on to the camera body. Alongside the main sound, this board is also responsible for the top handle controller encoding and the internal handle mic sound. It’s Sony part number is HN-1054 and is currently available on eBay for $126US.


4. Sound connection flexi cable

The Sumitomo AWM 20861 105C 60V VW-1 -F- is a 30pin generic ribbon cable. It connects the main board to the sound board. It is a generic ribbon cable and can be found in a lot of lengths. The one in the camera is 90mm long. Prices range from $5.00US upward.


5. Sound PCB

This is the part responsible for all the analogue sound of the camera apart from the handle mic. The spare part model number is AXM-1002 and it is available currently on Aliexpress for $99US. This spare part does not come with the XLR connectors, which are the Neutrik B series female chassis and must be purchased separately.


Correct cable connection

Please don’t do the mistake I did as you might not be as lucky and you might fry the camera main board. The correct cable connection on my handle is as illustrated in the following photo. The sharpie lines are not on the parts, I just used them to know what the right way is.


Regarding the sizes of the PCBs these are as per the following diagram

Full audio circuit assembly

And those are all my findings for now.

I am keen to see if someone uses this information to build an external audio input box, so please feel free to drop me an email with your finished product.

Good luck!

However, I then realized that I had not made sure I connected the ribbon cables correctly (picture above). Going back and tracing how the cables were sitting in the handle I found the correct way of connecting them and gave it another go. And this time it was successful, the camera booted up and also accepted sound from the XLR inputs!

Which means that the camera actually protected itself from damage when it sensed the incorrect ribbon placement, a safety feature that probably saved me from a fried camera mainboard. Phew!

[/tatsu_inline_text][/tatsu_inner_column]
[/tatsu_inner_row]

The parts

DISCLAIMER

By using the information provided below, you acknowledge and agree that any actions you take based on this information are at your own risk. I am not responsible for any outcomes related to the use of this information, including but not limited to, any damage to your camera or other equipment.

This is what most people will be here for. Since the interest in creating a sound input to the FX6 without the handle is large, here are my findings with full details and part numbers.

In order for the camera to accept sound it needs 2 boards, 2 ribbon cables and one connector. A total of 5 parts.


The parts required for sound import into the Sony FX6 are the following:

1. The connector

This is the part that connects to the camera body. It is a proprietary Sony connector with the code number HC1002 Board Connector In Handle. A quick Google search currently shows that part available both on eBay and AliExpress at a cost of $54US.


2. The data cable

This is another proprietary Sony part with the model name FP-2470 Flex Cable. It connects the HC1002 Board connector on one side and the HN-1054 driver board on the other. It is available on eBay at a cost of $37US.


3. Top handle PCB

This is the main board where all the data gets encoded and passed on to the camera body. Alongside the main sound, this board is also responsible for the top handle controller encoding and the internal handle mic sound. It’s Sony part number is HN-1054 and is currently available on eBay for $126US.


4. Sound connection flexi cable

The Sumitomo AWM 20861 105C 60V VW-1 -F- is a 30pin generic ribbon cable. It connects the main board to the sound board. It is a generic ribbon cable and can be found in a lot of lengths. The one in the camera is 90mm long. Prices range from $5.00US upward.


5. Sound PCB

This is the part responsible for all the analogue sound of the camera apart from the handle mic. The spare part model number is AXM-1002 and it is available currently on Aliexpress for $99US. This spare part does not come with the XLR connectors, which are the Neutrik B series female chassis and must be purchased separately.


Correct cable connection

Please don’t do the mistake I did as you might not be as lucky and you might fry the camera main board. The correct cable connection on my handle is as illustrated in the following photo. The sharpie lines are not on the parts, I just used them to know what the right way is.


Regarding the sizes of the PCBs these are as per the following diagram

Full audio circuit assembly

And those are all my findings for now.

I am keen to see if someone uses this information to build an external audio input box, so please feel free to drop me an email with your finished product.

Good luck!

[/tatsu_column][/tatsu_row][/tatsu_section]

2023 – A lot happening in the camera world!


Exterior shooting setup with a Blues player in front of the camera.
Cameraman Auckland Freelance New Zealand

2023 started as a very busy year, with a lot of domestic and international clients seeking for freelance camera department roles in Auckland. With smaller productions asking for a cameraman or larger ones asking for a DoP, it was all go!

At the same time, I can finally talk about some confidential projects I got to DoP! So let’s see what happened!


Passengers – TVNZ

At first, in late 2022 I was stoked to be offered to shoot most of the first episode of the TVNZ show “Passengers” . An amazing 2 days of filming with great Auckland summer weather and an even better group of talented people. A lot of filming around Auckland CBD and Puhoi to tell some very important and touching stories. Directed by Kim Webby and produced by Sarah Zwart.

Below Deck Down Under S1 – Interviews


This is one of the largest reality shows worldwide. But I hadn’t heard of it until I got the call to shoot some interviews. The issue was that due to COVID some of the talent were not able to travel. So we had to shoot them remotely out of Auckland. The tech and studio infrastructure used were those of NEP in Auckland. Zooming in to producers in both New York and Los Angeles was flawless, while lighting and sound was adhering to the very strict guidelines of a show of this magnitude.

The overall result was a very happy client.

The kit used was my FX6 camera and lighting package, as described in the “about me” page

Green screen setup for BDDU-S1 interviews


US Women’s soccer team interviews

At the beginning of the year a US agency contacted me to shoot some interviews of the very popular US Women’s soccer team. It wasn’t a simple job, as the quality expectations were very high. So I put together a nice package consisting of 2 x Sony FX9 cameras and chose to pair them with the Tokina Vista cinema lenses. And with the help of a great crew we made another client very happy.

These are some of the shots that made it to social, but there are plenty more to be released.


FX6 LUT workflow for FS7 users

By Christo Montes, Cameraman/Cinematographer – Auckland New Zealand

The new Sony FX6 is out and I consider myself lucky as cameraman since I was able to grab one of the first to arrive in Auckland, New Zealand. I immediately put it alongside my trusty FS7 and started shooting on it with excellent results. However, it did take a bit of time to get used to some different ways of doing things, one of which was the MLUT handling.

The FX6 does not follow the traditional system of the F5, FS7, FX9 of applying MLUTs in CineEI mode. It doesn’t even follow the traditional Sony way of doing things in Custom mode either and Alister Chapman has a very detailed and in depth post of how that has changed here .

The big difference is that now both CineEI mode and Custom mode have the same menu setting for changing the look and it’s conveniently named… Base Look/LUT.

In this new menu you will find the first 3 slots marked by the P in the beginning which contain the 3 stock Sony looks, S-Cinetone, 709(800) and Slog3. The next slots marked from 1-10 are the custom slots where you can load your LUTs from the SD card and keep there for using BOTH in Custom AND CineEI modes.

Base Look/LUT can be found under the Paint/Look menu option,

Paint/Look -> Base Look

or on page 5/10 of the touch menu

So don’t go looking for an MLUT menu or a way to load LUTs for CineEI. There is none any more. All image manipulating is now done with LUTs that are loaded in this new space (Base Look/LUT) that is used BOTH for Custom AND CineEI modes. But as Alister Chapman explains in his post, in custom you have the ability to change the look of the image while the LUT is on it, whereas in CineEI you can not. So the Hyper and 709 gammas of previous professional cameras are no longer there as options, but instead have to be loaded as LUTs. The cool part is that those same LUTs can be used as monitoring LUTs when you are in CineEI mode too.

And while I mention monitoring, in CineEI mode you can now choose your MLUT options independently from the LUT On/Off option in the Shooting menu. You can apply the LUT on the outputs, the VF/Proxy/Stream and the recording (for burning the LUT in) and this setting will also apply to S&Q and playback.

This took me a bit of time to figure out myself and admittedly it threw me off at first, coming from an FS7, but with the flexibility and ease of how LUTs can be created nowadays I find it an extremely simple and effective way of customizing the look of the camera and definitely the way to go forward.


NZCS Awards

It’s been almost 2 months of intense work. But now that things have calmed down a bit I thought I’d write about one of the most exciting things that happened this year. It’s the highest recognition for a cameraman in New Zealand. And that is nothing else than being awarded with the Gold and Bronze awards in the News & Current affairs category of the annual NZCS Awards for the following stories:

Tagata Pasifika – Tongan chef Touvai Poloniati (Gold)
Tagata Pasifika – Samoan boxer Baby Nansen (Bronze)

Thank you

I can’t really express my gratitude enough to all the people that made this recognition possible. From my parents who gave me the grounding as a cameraman in photography when I first started, to my wife and children who very often have to go through long times of me absent on shoots. To all the people in TVNZ and especially John Robertson, who have given me the foundations in broadcast TV when I first arrived in NZ and who put me on the first shoot for a program called Tagata Pasifika back in 2011, which 8 years later I would be collecting an award for!

A big thank you also to the NZCS committee who recognized the work and who made possible the screening of 2 Pacific stories in front of the best of the Cinematography industry in NZ. And last but not least, a big thank you to my Pacific family. The people that for the past 8 years I have been telling some amazing (and to be honest… a couple of boring ones too!) pacific stories with. My Sunpix producers, Ngaire Fuata, John Utanga and Stephen Stehlin. And of course, their great team of reporters/directors that I have the pleasure to hang out with so often, because it never feels like work!

On a personal reflection, these awards are very welcome and a much welcomed boost in confidence in my work, it would not be honest to claim otherwise. However, I do think that there is very much beautiful camera work out there that goes unrecognized. Recognition just sets the bar and it’s always good to constantly try and set it higher, driving the quality of our work up. That’s what I will be trying to do in the next year for sure and in the process try to bring as many of my peers with me as possible.

Until the next one, stay safe and have a great and relaxing summer break!


New Zealand’s darkest day from an ENG perspective

It was a long week, after I had gotten home from a school camp and straight in to an early morning shoot that Friday, the 15th of March 2019. Returning home I was only looking to get some rest and prep for a live cross on Saturday morning. And that afternoon, everything changed and I mean everything, with my schedule being the least of it. The lives of many families were suddenly overturned as 51 people were brutally murdered in an unprecedented act of violence. An act that was particularly shocking for a small, peaceful country like New Zealand.

News frenzy

News setup in front of the Christchurch Botanical gardens

And as the shock was settling in, the international news frenzy was picking up and in a matter of hours every news agency was looking for people on the ground to send pictures and news from the area of the atrocious act. At the time I was not involved much in news coverage, so didn’t think much of it apart from being glued on the local news and learning all the latest developments. That’s until the phone rung from the UK asking if I am able to pack and head to Christchurch in a few hours, for an unknown amount of days… And when the BBC calls, it’s not a call you turn down, so despite my fatigue from a full on week and shock from the heinous event, I packed and got ready for a 6:30am flight and further deployment to Christchurch for the BBC.

Having not worked with a major international broadcaster in the past I was not sure what to expect, but was prepared to pull out all the stops and do what it takes to just deliver my best work under some surely challenging situations, both technically, but most importantly, psychologically.

A numb city

The moment I arrived in Christchurch I felt the eeriness of a shocked city, possibly caused by the quiet streets on a Saturday morning, the sad people’s faces, the lost innocence of not only a city, but a whole nation. Feelings I did carry too, but had to suppress in order to be able to do my job unaffected and in the most professional way possible, despite that meaning a very hard night at the hotel room… But looking back a few months later from a professional aspect, it was all worth it.

As big as it gets

live cross to BBC news
Crossing live to main bulletin of BBC news UK

Working for the BBC is actually… as big as it gets… We started by doing some stories around survivors of the attacks and relatives. We did various pieces for BBC News and a few live crosses to BBC World. The highlight of my deployment though was no other than a live cross to the Sunday evening news bulletin. (7:00am Monday morning Christchurch time). I was expecting a LiveU setup with my camera and lighting. But arrived on location to find a fully deployed crew of engineers and satellite gear.

Full portable broadcast studio

Add to that, a fully rigged camera with autocue… A direct connection to UK and Sydney with video return… And generally a fully functional broadcast studio that was totally independent of any kind of local facility. The least I could say is that I was intimidated. But having deep technical knowledge and great experience in broadcast situations, I managed to light and shoot what turned out to be the whole 7pm news bulletin coming live from Christchurch. And everything went very smoothly to air, despite the chaos behind the camera.

Fun story… After we wet off air I repo’ed the camera for an interview, without knowing that we hadn’t finished the bulletin. And I had 30 seconds to re-set everything before we go to air again… Funny now, not then!

Setup during Christchurch victims memorial service

Looking back , I see that those days were of very high demand. So every camera operator with some basic industry relations would definitely be working. I do however consider myself lucky to get to work in such a professional environment such as the BBC. But what I found more satisfying is the fact that after my four day deployment, the relationship didn’t end with it. I got called back to do the memorial and then a few more things for the BBC including this story. Something that shows that my hard work and professionalism paid off, as I am currently the first NZ point of call for any BBC vision needs.

And that is a career highlight right there…


TP+ Summer Series

For my next blog post I thought I’d try and do a bit of a project breakdown of something that was a bit of a challenge. And the TP+ series I shot for Sunpix is a perfect example of that. So let’s get stuck in…

The concept

At first let’s see what this project was and the challenges it came with.

Our presenters, Alistar Kata and John Pulu

The team at Sunpix wanted to shoot a few summer episodes for their Tagata Pasifika show. These episodes would be aired in the Summer time, instead of episode recaps or reruns and as so they should be able to be done on a limited budget. The concept was one of a 22min panel talk episode, between a select panel of 1-3 guests and 2 presenters.

The challenges

The concept sounds quite easy and straightforward for the broadcast world. However the challenges were quite a few from a DOP’s perspective. Let’s start with the studio.

The studio

Behind the scenes. 2 x Cineflex light mats, LED backlights and Dedo for presenter key. That’s my son/assistant Theodore, sitting in 🙂

The space we had to shoot this in, was an empty office space in the company’s premises, with a total size of 5m x 5m approximately and a ceiling height of no more than 3.5m. In this space we would have to accommodate the massive, curved background LED screen pictured above and our panel table for 5 people. There was no space for trusses or any kind of ceiling mounted lighting rig.

The coverage plan

After discussions with the producers, we agreed to shoot this with 3 cameras. One would be fixed on our main presenter, in order for this to accommodate an autocue, the other would be fixed on a wide shot of the panel and the 3rd camera would be placed in such a position that it would be able to rove between closeups of the guests and the 2nd presenter. When we agreed on that coverage, we also thought it would be good to have an extra option in post for the wide shot, so we decided to shoot that in 4k, giving us the option to push in or do some pans in post.
An important factor that also played a big role in our camera placement was that we didn’t have 3 FS7’s, but only 2 and an FS700. The FS700 could not shoot 4k 50p (see below) so that was assigned the safest shot, the presenter lock off.
So this is what the camera coverage plan looked like:

  • Cam 1 – Sony FS7, Sigma 18-35 f1.8 – Locked off wide shot, shooting in 4k (to reframe in post)
  • Cam 2 – Sony FS700, Nikon 105mm f2- Locked off closeup of presenter 1 – with autocue
  • Cam 3 – Sony FS7, Canon 70-200 f2.8 – Roving closeup of the of panel guests and presenter 2

One more thing I needed to consider was the fact that we were delivering a show for 1080i broadcast. And as much as it would be easy to just set all 3 cameras to shoot 25p, I wanted the show to have that TV look to it, hence I wanted it to be delivered in proper interlaced format. Because we are shooting in 4k on one of our cameras though and because the show will also live online, shooting interlaced was not an option either. So I decided to just go for 50p acquisition on all cameras and talk to post about how to work on the footage in order to get the best for both worlds.

Lighting

This was the most challenging part. With a low ceiling and no truss the options were limited. The main challenge was to handle the reflections from the background screen panels. The amount of them and the curved nature of the array would create light reflections in at least one of the camera angles. So the only solution would be some ambient, soft lighting that would come from sources high enough and to the sides, at such an angle that they will not produce reflections on the wide shot.
So we set the background screen to warm and decided to shoot it all in 3200K.
For the key, totally up to the task proved to be my 2 Cineflex 100W mats with soft boxes sitting on 3m stands almost all the way up. These provided the main panel lighting. I also rigged 2 LED panels with diff gels on the top of the screen in order to backlight the guests and fill in for my side-lit presenters. The only thing missing was a bit of punch on our main presenter, which I achieved with a couple of Dedo’s, one for key and one as a backlight.

Result

Here is the finished result


Hope you enjoyed this article. I’m always open to discuss ideas and answer questions so please feel free to get in touch, either via email, Whatsapp or Instagram DM.
Thanks for reading!


Contact

hello@christomontes.com
Auckland, New Zealand
+64211857803

Connect
Privacy Settings
We use cookies to enhance your experience while using our website. If you are using our Services via a browser you can restrict, block or remove cookies through your web browser settings. We also use content and scripts from third parties that may use tracking technologies. You can selectively provide your consent below to allow such third party embeds. For complete information about the cookies we use, data we collect and how we process them, please check our Privacy Policy
Youtube
Consent to display content from - Youtube
Vimeo
Consent to display content from - Vimeo
Google Maps
Consent to display content from - Google